Introduction
MDDriver is a library allowing a user to easily couple molecular visualisation tools with simulation code through a network. This enables a user to perform interactive molecular dynamics, by visualizing simulation results and driving the simulation in interactive time.
Installation of MDDRIVER
Tools required
Optional tools (for using MDDriver with GROMACS)
- a specific patched version of GROMACS (cvs date 2007-12-08 for parallel runs, or 4.0.5 for mono-processor jobs)
- the fftw3 library for compiling GROMACS
- the VMD visualization tool (see below)
Compiling and Installing MDDriver (for MacOSX and linux)
Download MDDriver
We advise you to get the latest version from svn, and put it in the ${MDDRIVER_SRC} directory:
svn co https://mddriver.svn.sourceforge.net/svnroot/mddriver ${MDDRIVER_SRC}You can also get an MDDriver tarball from sourceforge via this link
Then decompress MDDriver
tar xzvf mddriver.tar.gzThis creates the mddriver source directory. In the next parts, we will refer to the absolute path of this directory as MDDRIVER_SRC. So please replace it by your own path: for example it could be defined as /home/martin/mddriver via the following command
export MDDRIVER_SRC=/home/martin/mddriver (for bash)or
setenv MDDRIVER_SRC /home/martin/mddriver (for csh)Compile and install MDDriver
mkdir MDDriverBuild
cd MDDriverBuild
cmake ${MDDRIVER_SRC}
make install (you have to be root)
This will install MDDriver in the default directory determined by the install prefix (/usr/local, be careful you might need to be root). You can also install MDDriver on your own install prefix (for example /home/martin) using this way :
mkdir MDDriverBuild
cd MDDriverBuild
cmake ${MDDRIVER_SRC} -DCMAKE_INSTALL_PREFIX:PATH=/home/martin
make install
Be careful, you must have the environment variables MDDRIVER_PATH, MDDRIVER_DATA_PATH, MDDRIVER_DIR, MDDRIVER_LIBRARY_DIR, and MDDRIVER_INCLUDE_DIR set in order to be able to continue. To do so, source the MDDriver settings script located in the bin subdirectory of the MDDriver install directory.
source MDDriver-config.sh (for bash)or
source MDDriver-config.csh (for csh)
Testing MDDriver
Before using MDDriver, you should test it using a test server and a test client which communicate with each other. For this you will need two terminals. In the first, type:
    cd ${MDDRIVER_PATH}
    ./servertest
and in the second console :
    cd ${MDDRIVER_PATH}
   ./clienttest
You should see energy and coordinate exchange between the server and the client.
NB: You could have the following error message when you launch the clienttest script:
  MDDriver >      Unknown endian machine - disconnecting
  MDDriver > ---- Leaving     iimd_init
  MDDriver > ---- Entering in iimd_probeconnection
  MDDriver > ---- Leaving     iimd_probeconnection
  MDDriver > ---- Entering in iimd_init
Don't worry, it could be due to a port problem. Try to fix the problem (e.g. the hostname must be "localhost" and the port 3000) in changing the port and hostname in the file: mddriver/src/clienttest.c by the hostname and port obtained when launching ./servertest.
Installing GROMACS with MDDriver support:
Before installing GROMACS, you have to install FFTW3
apt-get install fftw3 (for linux)or
fink install fftw3 (For MacOS X)
You can also go to the FFTW3 website for downloading and compiling from source.
Getting specific source of GROMACS
Then you have two options for obtaining the specific source code version of Gromacs which was used for MDDriver development. Both options will create a new gmx directory at your current path.
Option 1 : using CVS:
cvs -z3 -d :pserver:anoncvs@cvs.GROMACS.org:/home/gmx/cvs login         (no password)
cvs -z3 -d :pserver:anoncvs@cvs.GROMACS.org:/home/gmx/cvs co -D "2007-12-08" gmx
Option 2 : use our snapshot gmx-cvs-2007-12-08.tar.gz:
Download gmx-cvs-2007-12-08.tar.gz, then do
tar xzvf gmx-cvs-2007-12-08.tar.gz
Patch the GROMACS source code for MDDriver :
In the next parts we will refer to GROMACS_DIR as the absolute path where the Gromacs source code was copied (GROMACS_DIR=/home/martin/gmx for example). THE GROMACS_DIR VARIABLE MUST BE SET IN ORDER TO APPLY THE PATCH IN THE NEXT PART.
export GROMACS_DIR=/home/martin/gmx (bash)or
setenv GROMACS_DIR /home/martin/gmx (csh)then
    cd ${MDDRIVER_DIR}/../adapters/simulation/gmx-cvs-2007-12-08
    cmake .
    make
    make install
Compiling the GROMACS source code with MDDriver:
The GROMACS binaries, includes and libraries will be installed in /usr/local/gromacs, but if you want to install GROMACS binaries and includes in a user defined path (${GMXINSTALLPATH}), you have to change the prefix via the configure script (./configure --help) . For MPI support with GROMACS, you have to enable MPI and should change the executable suffix for convenience.
    cd ${GROMACS_DIR}
    ./bootstrap (if needed)
NB: the bootstrap script just launches commands such as aclocal or automake. Sometimes it is necessary to change the version of these programs. To do that, you just need to edit the bootstrap file and add the version information (-X.X) after the actual command names (where it is necessary).
For a linux machine (or if you don't use fink)
CPPFLAGS="-DGMX_MDDRIVER -I${MDDRIVER_INCLUDE_DIR}" LDFLAGS="-L${MDDRIVER_LIBRARY_DIR}" ./configure --enable-all-static --without-x --enable-float [--prefix=${GMXINSTALLPATH}] [--enable-mpi --program-suffix=_mpi]For Mac OS X using fink, you have to set a non standard fink library and include its location before calling the configure script :
CPPFLAGS="-I/sw/include -DGMX_MDDRIVER -I${MDDRIVER_INCLUDE_DIR}" LDFLAGS="-L/sw/lib -L${MDDRIVER_LIBRARY_DIR} " ./configure --enable-all-static --without-x --enable-float [--prefix=$GMXINSTALLPATH] [--enable-mpi --program-suffix=_mpi]NB: texts between brackets are optional. Do not type this text if you don't want to use the option, or just remove the brackets and add to the configure command line to use them.
Then just type:
    make
    make install (maybe you have to be root)
Remarks about GROMACS 4 (parallel runs not yet supported!)
You can also use the GROMACS version 4.0.5, by downloading it on the GROMACS website, or by getting it on the MDDriver sourceforge site. The same patching procedure has to be applied to the GROMACS version 4.0.5, using the path located in the ${MDDRIVER_DIR}/../adapters/simulation/gromacs-4.0.5 directory instead of ${MDDRIVER_DIR}/../adapters/simulation/gmx-cvs-2007-12-08.
AS OF NOW (JULY 2009), THE GROMACS 4.0.5 MPI VERSION DOES NOT WORK WITH MDDRIVER. YOU CAN CURRENTLY ONLY USE IT SEQUENTIALLY (MONO-PROCESSOR JOBS).
Finally, we suggest to add the Gromacs binary to your PATH :
export PATH=${PATH}:${GMXINSTALLPATH}/bin (for bash)
or
setenv PATH ${PATH}:${GMXINSTALLPATH}/bin (for csh or tcsh)
Or to source the GMXRC scripts (maybe in your .bashrc):
source ${GMXINSTALLPATH}/bin/GNXRC.bash (for bash)
or
source ${GMXINSTALLPATH}/bin/GNXRC.csh (for csh or tcsh)
Interacting with a GROMACS simulation via VMD using MDDriver
Lauching the simulation:
Go to the data directory, then choose one of the example subdirectories:
cd ${MDDRIVERDIR}/data/02_peptide_200First you have to convert the molecular description of the molecular system in the pdb file model.pdb and prepare the simulation input for Gromacs :
pdb2gmx -f model.pdb -o model.gro -p model.top
mkdir output
grompp -f imd.mdp -c model.gro -p model.top -o model.tpr
Then you can run the simulation, providing Gromacs with parameters for MDDriver. The parameter IMDfreq is the number of timesteps between two MDDriver exchanges. When IMDwait is set to 1 this means that the simulation will wait for a client connection before starting, The parameter IMDport is the port on which data wil be sent and IMDmsg sets the log level, from 0 for no messages to 3 for verbose logging (be careful to use the mdrun executable compiled with MDDriver).
mdrun -IMDfreq 1 -IMDwait 1 -IMDport 3000 -IMDmsg 1 -s model.tpr -x output/imd -deffnm output/imdIf you use an MPI version of Gromacs/MDDriver, pay attention to execute Gromacs with the same MPI version as it was compiled with!
Lauching VMD :
Start the VMD program (double click on its icon or launch from the command line).
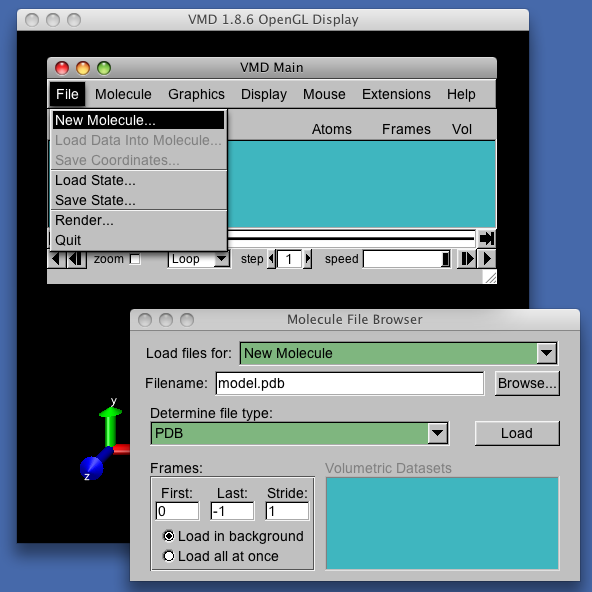
- Open the description of the molecular system in the pdb file model.pdb that you have used for the simulation :

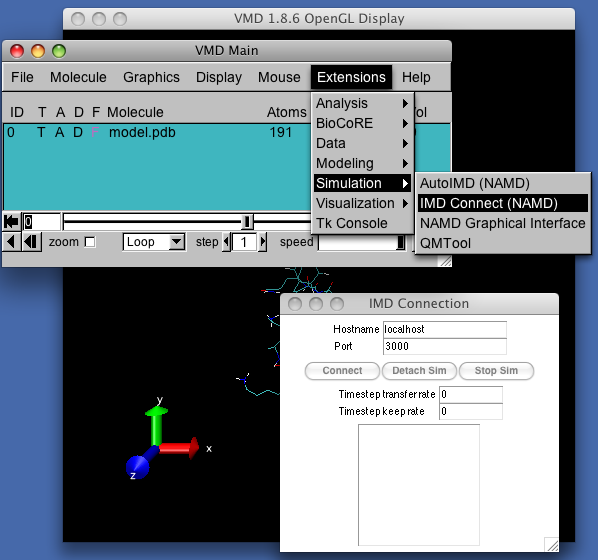
- Connect VMD to the running simulation, specifying host name and port number on which the simulation was launched, then click connect.

Interact with the scene, using VMD tools:
In a low VR Context (no haptic devices, only the Mouse available) go to the menu Mouse>Force and choose a selection mode (atom, residue, fragment). Then you can pick atoms (residues or fragments) in the rendering window and influence the running simulation by applying additional user-defined forces. For a higher VR context (with a haptic device for example), first lauch the VRPN server managing your VR device, then define a .vmdsensor file to configure your device (you might have to restart VMD when you change this file), and finally you can use the Graphics>Tools menu to define the interaction mode of your device with the simulation.
The end!
We hope you enjoy interactive simulations vie MDDriver and please let us know about your applications and discoveries!
Copyright and License
This program is under the CeCill licence, which is compatible with the GPL licence.


